Monday, April 14, 2014

Bunnies and Carrots and lambs...oh my!!

Hi there!
Today I want to share an assortment of chocolate bunnies, baskets, lambs and carrots that my daughter and I made! 


I bought a wooden fence box at Target for $3 and then cut little pieces of Basic Grey "Fresh Cut" papers to fit the fence and used Mod Podge to adhere them...I sanded some of the rough edges with sand paper! I hand cut a little tag and tied with yellow ribbon! 
This is for my In-laws and my nieces and nephew...a family of 6! So there should be no fighting, lol! This turned out super cute and u hope they all enjoy it!
I am entering this in the SSS Wednesday "Happy Easter and/or Sweet Treats" challenge!  I think this fit the bill!! I am also entering this in the Cardztv 3-D Easter Challenge!

Have a great night and thanks for stopping by!

Saturday, April 12, 2014

Light it up!

Hi there!
Here are some cards that I made with the  April SSS card kit! The stamp set is called "Watt's Up?" And features a light bulb, light rays and cute sentiments! 


Even though this card doesn't feature a light bulb, I used the dotted heart in the stamp set and some of the small solid hearts to create my own pattern paper. I used a SSS "lots of hearts" die to cut a pink greet and white embossed it with a sentiment from the stamp set! 
This is a fun kit to create cute "punny" cards!  I had fun creating these three cards!
Thanks for stopping by today!

Wednesday, April 9, 2014

You + Me = Friendship

Good morning!
I have a cute card to share today...after working on it for days...lol!  I have had a fever and been under the weather, so I just did a little here and there! 


I made this card for the Lawnscaping challenge #79: try a new technique!  I have been taking different classes on line and have been playing with lots of different techniques, but when I pulled out (my sons favorite stamp set) my into the Woods Lawn Fawn stamp set I knew I had to try a new technique ...one that I have never tried before. A Pop Up Card!!!
So, I got to work. I stamped the images and colored using Prismacolor pencils and Gamsol and die cut them then added some black gel pen to the eyes and noses.  I ran blue ink on the edges of the cloud and embossed them with the Swiss dots folder.  I used some lawn Fawn Hello Sunshine pattern paper and polka dot paper. I white embossed the sentiment on vellum and adhered over the hand cut green grass. 
The pop up was made using a smaller size cardstock where I used TH distress ink to make it look like the bottom was grass and the til was sky (mowed lawn, tumbled glass and faded jeans) I cut a slut in the card to create the pop up and added a log that was stamped and cut and then added some of the animals!  So cute and fun!  I will surprise my son with this card and I know he will just love it. He is 12 and probably my biggest fan! Love that boy!!!
Thanks for stopping by and u would love to know what you think of this card!  Have a great day!!

Monday, April 7, 2014

Stripes Galore!

Good morning! 
I just finished up a card using the positive die cut from yesterday's card. I stuck with the same "birthday hugs" theme from yesterday!  I thought these would be fun cards for my 10 year old daughters friends birthdays. They are all into giving everyone hugs!! So cute! 


Anyway.....I used the SSS Wide Stripe BG stamp and cotton candy ink to create a subtle BG.  I adhered the Hugs die cut from yesterday's card (SSS spring cardstock strips...using the big hugs SSS die) and covered it with Wink of Stella glitter! I cut little flag shapes from the Audrey Blue and Doll pink cardstock and used sentiments from different sets. The "happy" is from the SSS Color and Sunshine stamp set and the "birthday" is from MFT "Celebrate" stamp set. I love the mix of fonts...these were white embossed.  I also cut some stars from the Mama Elephant Confetti die and added some glitter to those also! Every girl needs a little sparkle, right!!! 

So, that completes this fun birthday card 
For today! I am entering this in the SSS Wednesday Birthday challenge...great prizes are offered! Come check it out!
Have a great day!

Sunday, April 6, 2014

Birthday Hugs!

Hi there!
Here is a card that I made today! I just wanted to create something and be busy so I started cutting some strips of paper from the SSS "Sweet Treats" Spring paper release.


 The widths are random but the lengths are all 5 1/4" long to fit a landscape card A2 base.  I adhered all the strips to a white card base and then die cut the SSS Hugs die (of course I saved the hugs for tomorrow's card!). I then adhered a white piece to the inside front and adhered the little colorful inserts into the letters. So fun! 
I stamped the "birthday" (from Avery Elle" on a flag shape using SSS doll pink ink and used foam tape and added a little heart!  
This card is for the SSS Wednesday Birthday challenge where SSS is celebrating 5 years! There is a huge prize so come check it out!! 
This card was super easy but fun to make and tomorrow I will share the 2nd card I made with the positive from today's card! Thanks for stopping by! Have a great night!

CAS cards

Good morning!  I have 2 cards today using the SSS Mod Window die!  I have had so much fun with this die because I love mixing colors and fitting the pieces back in like a puzzle! I find it very relaxing to put these simple cards together!
This first card is for the Simon Says Stamp birthday challenge....celebrating 5 years of challenges! Yay! HB2U SSS!!!!


For this card I die cut the Mod Window out if the white panel and then cut it again out of SSS Audrey blue and Doll Pink and black. I put the pieces back in alternating the colors and matted it on a black panel and then adhered it to a white card base.  I stamped the happy Birthday using the Avery Elle Handwritten notes set and adhered some black enamel dots. 


While I was making the other card...I decided to use the pink base from die cutting the circles from the other card and adhered it to a white card base. I filled it in with some of the left over pieces. I used the SSS Thanks on a Line die and cut it out in black and adhered it to the card! Super simple and I love the fun colors and getting two cards for one!

Thanks for stopping by today!

Monday, March 31, 2014

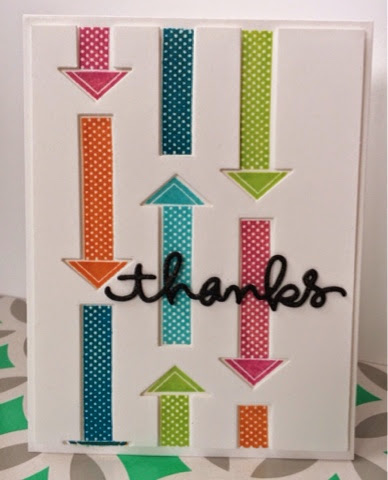
DIY Cover Plate....

Good morning!  Here we thought we were on our way to Spring weather and then boom....we have snow, ice and rain today! Boo hoo! However, it makes for a day to stay in do some laundry and craft! Yay!
So here is a card that I had started last week and just finished up today! 


 I got this idea to make my own cover plate using dies from last weeks PTI challenge. Betsy Veldman shared her idea on the blog using colorful arrows in her cover plate...so I kind of copied her card....
Now really the only die that I had that would work for this technique was this arrow die ( that I just bought from PTI). So I took it and ran!
I die cut the arrow (Just Smile dies) numerous times just eyeballing it each time to make three rows of arrows. Then I temporarily adhered it to the card so I could stamp the arrows and get them in the right spot. I used the Just Smile coordinating stamp set from PTI and stamped in different colors.  The inks I used are from SSS (I just won the whole set on Vicky Papaioannou's blog...thanks Vicky). I used Green Apple, Orange Peel, Island Blue, Audrey Blue and Doll Pink! 
I then used foam tape on the back of the cover plate and adhered to card base!  I used a SSS thanks die and cut it out of black card stock and glued 3 of them together and added wink of stella glitter on top and then adhered that to the front!  Super fun and I just love the simple look with the colors the white space and the pop of black! 
So, I wasn't in  Time to add it to the PTI challenge but I am glad that I finished it and I love  how it turned out!
Thanks for stopping by!

Saturday, March 29, 2014

Coin purse and pencil case!!!

Hi there!  A few weeks ago Papertrey Ink (PTI) had a release and I immediately fell I love with the "coin purse die" and the "seasonal stitching: birds die".  What a great set of dies! I couldn't wait to get the set and start making my daughter some little coin purses and to have some on hand for gift cards! 
I bought the Raspberry Fizz and Aqua Mist  felt rolls as well and got to work creating! Oh and Erin Lincoln recommended some zippers from Etsy and they were so reasonably priced! 
Here is the coin purse:

I also bought the mini button dies...aren't they cute?! The colors on the pics are off because it is a damp rainy day here!  The zipper was super easy to put in and I was so proud of myself!


Here is the pencil case...it is a bit small for regular kids pencils, but really cute!  For the name, I used a Amy Tangerine stitching template! I also mixed in the teal felt from MFT!  
These were easy to make and I think they are super cute!
My next step is to use some real material and step it up a notch!
I am entering this project in the SSS Wednesday challenge...anything with buttons!
Thanks for stopping by and have a great weekend!

You're A Life Saver

Good morning! 
Here is a card that I made using this weeks MFT card sketch 169....


I immediately saw the flower as a life raft or life saver and new I wanted a nautical feel!  I grabbed my favorite MFT Go Overboard stamp set (I love the large size of the images and sentiments in this set). 
Here is my card.....

I used MFT kraft and embossed it with the polka dot cuttlebug folder. I grabbed some navy card stock and embossed the   Anchor strip (perfect for a card base) using white embossing powder.  I added some May Arts twine and tied a sailor knot and adhered to the bottom of the kraft card stock. I used my spellbinders label set and cut a base using cherry red MFT card stock and then a white one and stamped the sentiment. I die cut the life saver using the MFT Lets Get Nautical die set. 
This card came together so fast and u love how it turned out...thanks to a great sketch!
Thanks for stopping by and have a great Saturday!!

Wednesday, March 26, 2014

Thanks graffiti style!

Hi!   Hump day already??    Where does the time go?? My day was spent cleaning the house and making dinner...boring!

I have another card to share from taking the C&S one layer cards3 class!  The idea came from Shari Carroll and it was for a graffiti style card using a die cut in lay and several different sentiments in different colors!  


I chose the SSS thanks die and inlayed it in SSS mint card stock and used several stamps...some of them I couldn't find to link up but they are....SSS "thankful for you" from the February card kit, SSS "you" stamp and SSS "where the heart is" stamp.  The rest of the supplies used are linked below!  I cut a strip of the rainbow stripe from the page that has all the border strips and added some fun sequins...sorry I can't help it, love them!

Thanks for stopping by tonight!

Tuesday, March 25, 2014

Colorful Cards!

Good morning! 
I have two very colorful cards to share today!  I am still having fun playing with different techniques from the card class that I was taking. Even though class is over we still have a week to create and post in the gallery...after that the gallery gets locked so we just can't add to it but we still get to see all the inspiration posted.  So enough rambling.....


For this card I used lots of colorful embossing powders and just cut strips of masking tape to 1/4 inch ( a trick I found is to adhere the masking tape to a piece of paper and then cut strips) and added a strip for the sentiment. The embossing powder I used is a colorful set from recollections and I don't like it much but it did the trick. I did one color at a time and heat embossed, worked much easier for me. The sentiment is from MFT "celebrate" set and I thought the large sentiment worked! 


Here I used a stencil and did clear embossing (can't see it) and then I colored in the pattern using distress inks and a blending tool.  I masked off an area for the sentiment (Avery Elle- Handwritten Notes). I was going to try the "iron-off" embossing technique but I really liked the texture and subtle shine, so I left it as is.  I cut this card to be a 4 bar card (3 7/8x5). I actually like this size card and will work with them more! 
So that's it for now! Have a great day!

Monday, March 24, 2014

Coloring Hydrangeas!!

Hi there!  I have two more cards to share using the same hydrangea stamp!  

For this card I used my new copic markers and my Spectrum Noir markers. Michaels had a BOGO 50 sale last week so I was able to pick up 4 copic sketch markers in blue tones! Yay!  I really wanted to compare them to the Spectrum Noir markers and I think I am addicted!  My husband was all set to bring me back to michaels with his wallet so I could get a bunch more markers and then the news came that my car may need a new transmition...yikes, so there went my trip!! 
Anyway for the flowers I used the Copics in B00, B21, B34 and BG70. I love how they blended. For the stem and leaves I used the Spectrum colors CG2, DG2 and DG4. I think they actually blended nice but the Copics go on like butter! 
I stamped the sentiment in a grey (and I don't know why) and it looks terrible...should have went with gold or black but I didn't want to trim the card. I added an embossed frame around the card and looks great IRL!

For this card...I white embossed the hydrangea and the sentiment (Avery Elle) and then used a new (cheap) watercolor set and just brushed it on starting at the top with a dark blue then a light blue where the flowers are then where the leaves started I used a dark green and then a light green on the bottom!  I actually love the watercolor paints that I picked up, the colors are so pretty! I rounded the top corners (which I don't like) lol and added some white enamel dots!  
I have a few more cards to post hopefully this evening!  Thanks for stopping by! 

Friday, March 21, 2014

Watercolor hydrangea!

Hi there!  Can't believe another week has gone by! I had a meeting this morning and then some time to craft before the kids got home!  I created 3 cards with this hydrangea stamp (I honestly can't tell you what brand but I have had it for years)!  For this card, which is probably my favorite of all 3,  I used some TH distress markers ( broken china, stormy sky, faded jeans, forest miss and peeled paint) and colored on the stamp then gave it a few good mists of water and stamped....I was so happy with how it turned out!  I used the MS score board to emboss a frame around the panel and stamped the sentiment from MFT "you make my day" with versamark and gold embossed it! I addeded some twine (from a lawn Fawn pkg) and tied a bow! Done and super simple! 
 
The paper I used for this is a pad that I got my daughter (she wanted acrylic paints, paper, charcoal pencils and brushes) so I figured I would try it!  It is a Strathmore Mixed Media pad...I believe 140 lb and I just loved it...no warping!
So today was the last day of my on line card class and I loved it! So many fun techniques to create one layer cards! I will post throughout the week the rest of the cards that I make for class! 
Thanks for stopping by and have a great night!

Wednesday, March 19, 2014

So Happy For You!!

Hi there! Another card to share tonight!  We are adding texture to our one layer cards in the class I'm taking...C & S one layer cards 3!  
I had this done earlier but had to wait to post it...did some clothes shopping with the kids! Seems they went through yet another growth spurt!!
Anyway.... I started with a white panel that was 4 x 5 1/4 and I stamped the butterfly from the Hero Arts Butterfly and Flower set using white embossing powder). I used my Spectrum noir markers ( PP1, BT2, TB1, colorless blender) to color. Then decided it wasn't the look I wanted so I re embossed using gold powder. I die cut the butterfly to create a mask and used a post it note for the sentiment.  The sentiment was gold embossed using the MFT Celebrate stamp set. I used Heidi Swapp's Gold and mint spray and used a paint brush to just just flick onto the card. Then I used the SSS falling snow stencil and white embossing paste to add a confetti look. When I went to adhere it to the card base I wasn't happy with it so I took some TH tumbled glass distress ink around the edges and a thin strip of gold glitter tape to the top! There...I was happy with how that looked! 
So after all that....here's the card!


An up close shot of the butterfly and the splatter! 
The inspiration for this card came from Debby Hughes (the instructor in class)! 
Thanks for stopping by! Have a great night!

Monday, March 17, 2014

Hello blue bird!

Hi again!  
I want to post this quick card that I made this afternoon before we sit down for a yummy corned beef dinner!!


I did some watercoloring and even though I mounted it to a left card base it is still a one layer clean card to me! Lol!
I stamped the bird image using a Martha Stewart stamp and used TH distress markers and water to color it in!  I added a pearl for the eye, some twine and I embossed the frame around the image just using a bone folder and my paper trimmer! The hello sentiment is from the SSS "Where Your heart Is" set and I used soft granite ink by Hero Arts!
Thanks for stopping by! That's all from me for tonight! Enjoy your evening!

Colorful hugs!

Happy St. Patrick's day!!  
I have my corned beef simmering...I look forward to cooking it every year and my son just loves it!  He's 12 and he still calls it the "stringy meat!" Lol!!
So here is the card I made today for day 7 in the C&S cards 3 class that I'm taking on line!  We are focusing on simple coloring techniques!  


I started with a woodgrain cardstock from SSS and die cut the hello using a SSS die and a heart also from SSS...can't get enough of their dies! I then colored on vellum with TH distress markers and glued it in place behind the die cut!  I added some LF sequins for bling! The inspiration for this card came from Kristina Werner! 
Thanks for stopping by and have a great day!