Friday, January 28, 2011

Valentines Day Wreath!!

Hi everyone! Happy TGIF...what a week, I am looking foward to relaxing and spending time with the kids this weekend! We are all so into lego's right now, so that is what we will do!!
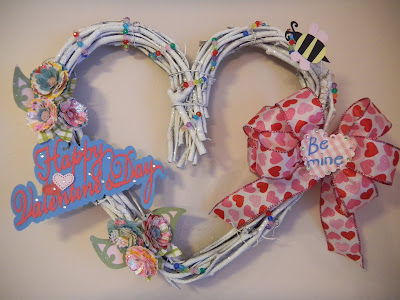
Here is a Valentines Day wreath that I made for the monthly cricut circle challenge. We had to scraplift a blog project, put our own twist on it, use 2 cuts and use 2 products from cricut sponsors!

I was inspired by Sarah's winter wonderland wreath and decided to make a Valentines Day wreath!
I started with a brown heart shaped twig wreath and spray painted it white, while it was wet I added some clear glitter. I wrapped some multi colored facet beads around with some clear beading wire.

I cut the Happy Valentines Day sentiment from Martha Stewart Seasonal cart with the shadow and used a MS heart punch and some i rock bling. I added a bow and cut the heart from MS Seasonal cart used some bling and cut the letters with the cuttlebug slobbery kisses die. The bee was cut with WIMG and added to the wreath with some silver wire that I coiled a bit! The flowers were made with the cuttlebug quilling kits. I used the daisy and the rose. I used Echo Park Little Girl paper and added some clear and pink glitter. The large leaves are cut from Gypsy Wanderings and glittered up a little, I also used some smaller leaves from the daisy quilling set.

I think it came out cute...I had a great time with all the glitter and the quilled flowers!! This will hang on my front door when I can get some suction cups!!

Cricut: Walk In My Garden, MS seasonal cartridge and the daisy and rose quilling kit

Sponsors: bazzil, Echo Park and Imaginisce Irock

Thanks for looking and have a great weekend!!

Thursday, January 27, 2011

Imagine Cards!

I forgot to share these cards that I made a couple of weeks ago! I was lucky enough to snag the last Wild Card cartridge from the clearance sale at M's for only $9.99.....I am so happy that I got this cart, it has some great cards, envelopes with liners and shapes!

So, I was able to play with the Imagine a bit and used the Imagine More cart that came with it. I chose the owl card and printed and cut using the Imagine. I added some twine and the sentiment is a stamp. How cute is the envelope with the tree??? I just love this cartridge! This card was for my FIL's birthday!

This is another card from Wild Card! I cut it using the Imagine, but chose my own papers. This card was for my Husbands Aunt who broke her knee! I used the band-aid card and the medical bag and the Rx for the envelope!
This card is my favorite of all the card cuts on Wild Card....I love the argyle and thought it was a perfect card for a man. The sentiment is a stamp. Look how cute the envelope is with the argyle cuts and the envelope liner with the distressed edge, just love it!! This card was for my BIL!
So, those are my cards made with Wild Card and the Imagine! I love how they all turned out and can't wait for some more time to play with the Imagine!
Thanks for stopping by!
~Jeannine


Wednesday, January 26, 2011

Animal Wobbler Cards!

I couldn't resist ordering these adorable animal cards from HSN last week! When I bought them, I thought they were going to be the wobble springs, but they aren't....by wobble they mean rocking, where the base of the card is curved which makes it rock back and forth. I am so pleased with these cards and seeing them in person, they are so much cuter than on tv. The cardstock is heavy weight, the shapes punch out so easily and the details on the animals is amazing. Some of the animals have a bit of foil detail on them and just make the cards pop. I used pop dots with some of the pieces to add dimension. Another thing I was pleased with was the size of the finished cards and the envelopes....although these will require additional postage if mailed, it is well worth it. The kit came with 20 different animals and with shipping and tax, it works out to be about a $1.80 a card!

So here is the kit spread out on my kitchen table:
And here is the giraffe card assembled:
I used some of the green cardstock for the base of the card to add color to the card, this card measures 8 1/2 x 7 inches.

Here is the sheep card assembled...this card measures 7 x 7 inches!

Here are some details in case you wanted to order these adorable cards for yourslef:
Hsn.com, Kanban wobblers card kit item # 111969, I got them for $26.95 plus tx and shipping,
the envelopes measure 8 x 8 and will require additional postage, each animal is die cut and pre printed.......these adorable cards assemble in minutes with some adhesive and pop dots!

Sunday, January 23, 2011

LETS GO JETS BANNER!

J-E-T-S.........JETS JETS JETS!!!!! We are Jets fans here, with the exception of my son...lol!! The principal at the kids elementarty school reminded kids to wear green on Friday to support the Jets game tonight! My 7 year old daughter came home and wanted to know what she had that was green.....not much, so we went into her brothers room and found a Jets jersey. He said she could wear it and she was just so excited!! She wore it to school and had her picture taken for the year book! She came home and asked me to make a JETS banner, so of course, I got to work on one. I designed it on my Gypsy......the flag shapes are from Stand and Salute (not really meant to be a flag I know, but I thought the shape was sporty looking. The font is from MS all occasion and the font is the smart cookie, perfect for the banner. Honestly, I am not sure where the oval was from, but I thought it was the perfect shape...lol!! This came together so fast and was so easy. My daughter's smile from ear to ear let me know that I did good! I used a white embossing pen for the faux stitch border. I also made her a little flag to wave as she watches the game (some of the game) and just added some ribbon to make it girly!!! I had fun with these quick little projects. We are looking foward to watching the game together tonight! Lets go JETS!!!

Edited to add:


Here is a picture of my little JETS fan with her flag and her little football.....how cute is she!!!!!

Saturday, January 22, 2011

Get Whale Soon!

Hello! Hopefully everyone is staying warm...it is starting to get quite chilly here for us and may be going down to single digits tonight! We had a busy morning with the kids....Christopher plays basketball for 2 hours on Saturday's and he loves it! Samantha goes to a gymnastics program and learned how to do a cartwheel and a tumble on the balance beam....she is so cute!
So, we are glad to be in the house in our jammies and just playing around!
I made this card for my 6 year old niece who had her tooth pulled the other day, poor thing! She was so brave and did well! I think she will be excited to get this colorful card in the mail!!

The whale is from CAC (Create a Critter) cut at 4 inches on the Imagine....the two base cuts were cut and colored on the Imagine and the yellow scallop base was cut using the images preloaded onto the Imagine. The papers are Love Me Do from My Minds Eye...such cute colorful paper! I stamped the get whale soon, cut apart and added some MM velvet brads. I also added some blue bling to add some wavy water and I couldn't resist adding a little bow!
I hope she smiles when she gets this card in the mail!!!


Thursday, January 20, 2011

The Polar Express!!

Good afternoon all!!! In between trying to clean the house today, I was able to pice together this layout using my Gypsy and Imagine!!! This is for the cricut circle weekly challenge....we used a sketch (witch I stuck to just to get my mojo back), 2 cuts, buttons and some stamping! The pictures are from a trip we took to the "North Pole" to go on the Polar Express! I was able to layout my page on my Gypsy and then made the cuts on the Imagine! I added buttons in the center of the snowflakes and stamped the ticket and cut it out and added some bakers twine tied to the snowflake! After all was said and done, I am pleased with this layout!


Hope you all have a wonderful night! We are in for some snow again tonight so the kids fingers are crossed that there will be no school or a delayed opening!!!

Thursday, January 13, 2011

The Magic of Winter!!

Hello friends!! It has been a very very long time since my last post in early December....wow!! All I can say is one four letter word...............BUSY!!!!! I will post an update and some recent pictures of our Holiday and adventures, but for now, I have a cute project to share! I am back into the scrapbooking mojo a bit...a little here and a little there!
I made this winter magic bag for the weekly challenge on the cricut circle blog! We had to use white paint, metal and a snowflake cut....simple!! I planned all of the cuts on my Gypsy, so forgive me, I don't know the sizes. The bag is from TBBM stretched to fit a 12x12 mat....it is a rather small bag, but just perfect for some mini chocolate treats!

I cut different snowflakes out and placed them on the bag (while the bag was unassembled) using some repositionable adhesive and then used white spray paint. I took off the snowflakes and VOILA!!!! I have to say that I absolutely love this technique and my children were in awe over it...lol!!!! Then for the metal, I used a siver glitter tag using the tag maker. I cut the snowflake and used mod podge and some chunky clear glitter.........here is a close up!!
I added some sheer blue ribbon and had an adorable winter magic mini bag!!!!
So, before I go into my long update over this weekend..............I want to share.....................
I got the Imagine for Christmas!!!!!!! I had a chance to play with it a bit...and by bit, I mean like for half an hour....lol!! I am in love! I also got a flip, so I hope to be sharing a video or two soon, I need to practice a bit before I post!!!!!
See you soon!!!
Jeannine

Monday, December 6, 2010

Our Christmas Anniversary!!!

Good morning!! Today is our 13th wedding Anniversary....Happy Anniversary Chris!! I can't believe we have been married for 13 years already....feels like just yesterday! We had a beautiful December wedding with our reception in a beautiful place right on the ocean! We just had a wonderful day with family and friends!
Today has been flurrying on and off, just like it did on our wedding day....I love it!!! My husband and I are going to go to lunch at a nice restaurant in town today while the kids are in school and then I am making Chris' favorite dinner tonight....stuffed peppers....I also got a little ice cream cake because my son asked me to pick one up for him as his gift.....how cute is that!!!


This is me on my wedding day at my parents house!
Here is my husband and I outside of the Church....officially married!!!
I love my husband more today than I ever thought possible. He is a hard working, supportive, loving husband and he is truly my "girlfriend"....we laugh all the time when I tell him that. I can tell him anything at any time and he just listens and gabs right back to me....like we are "girlfriends"....I love it!!! I love you Chris!!!
Well, sorry the pics aren't the best...they are pictures of pics because my scanner isn't working...but I just wanted to "post to my on line diary"!!!
I hope you all have a wonderful day...and stay warm no matter where you are, because it is a bit chilly willy here!!!

Saturday, November 27, 2010

"JOLLY" gift tags!

I was lucky enough to grab the Jolly Holidays cartridge at Walmart on black Friday!! I don't have any other cartridges that feature all Christmas/winter images, so I was thrilled to get my hands on this Jolly cartridge!
I took my 6 year old daughter to see the movie Tangled this afternoon....what a cute movie, we both really loved it!
I made these cute tags after we got home from the movie! The girls gifts are going to be wrapped in pink and green this year, so I made the tags to coordinate!
The tags were cut using DCWV Secret Santa paper stack and I used tulle and of course a little bling using the i rock! The mittens were cut at 1 1/2" with the tag at 2 1/4", the snowgirl was cut at 2" with the tag at 3" and the stocking was cut at 2 1/2" with the tag at 2 1/4"! I probably could go a bit larger on the tags, but this was my first attempt! This cartridge is just so cute and I think the kids will get such a kick out of some of the "jolly" images!


Wednesday, November 24, 2010

Gobble Gobble!!

Happy Thanksgiving!! I hope you all have a blessed day with family and friends!!

I am thankful for so many things that I wouldn't want to bore you with, so I will just say this: I am truly thankful for a supportive, caring and loving husband who is my best friend, my beautiful children who are healthy and bring joy to my life every day, having a hobby that brings myself and my family joy........and might I add, my Mom for cooking this Thanksgiving...lol!!!!

I want to share with you my creations for today....not only did I make the sparkling cider look pretty, but I also made a cornucopia and decorated a pie!! Thanks to the cricut circle blog for sharing such wonderful creations that we (I) can scraplift!!!
Here is a pumpkin pie that i decorated:

I bought the pie and used pie crust for the pumpkins and leaves....I used MS seasonal for the pumpkin and DC for the leaves!
Might I add that I have not been successful with the cake machine up until this point....I was feeling a bit guilty that I bought it, couldn't get it to cut and didn't have the patience to figure it out. Well, today all of those thoughts disappeared....I am in love!!! Yes, it is a lot of work, but so well worth it....I even got the whole family to pitch in willingly. They cut, colored and sugared!!! I am truly blessed!!

Here is the cornucopia!


Well, it was fairly easy to do, but I had a problem getting the foil out of the cornucopia, so it is still in there....lol!!! I didn't want to destroy such a beautiful creation....we will just eat around the foil....lol!!! I had so much fun with this project, thanks to Kristen from the CC blog! I used vines, pumpkins and leaves, colored them with wilton cake colors and sprinkled with chunky sugar! My family loved helping with this and we were all so proud of our beautiful creation! Can't wait for my Mom and Dad to see it tomorrow.....and even more..dig into it, yummy!!!
Have a wonderful Thanksgiving!!!


Spruced Up Sparkling Cider!!

Hi there!
Just wanted to jump on real quick today to share this project with you! I made it today for the kids for Thanksgiving. We are going to my Parents house for dinner tomorrow and we are bringing this, a pumpkin pie and we are in the process of making a cornucopia....fingers crossed it will turn out ok!!!! I got this idea from Kristen on the cricut circle blog and just made it into a simple version!!! So, thank you Kristen for the idea!
So, here is a bottle of sparkling cider that I spruced up with some cricut cuts and ribbon! I used Designer's Calendar for the leaves cut out at 3", the tag is from Plantin Schoolbook cut at 3", the Harvest blessings was cut from the Thanksgiving cartridge at 2"...I forget where I cut the acorn from because I cut a bunch for the kids last week...lol!!!
I embossed the leaves with divine swirls and then used chunky glitter on them! I also quilled a flower with the cuttlebug quilling daisy kit. I added glitter to one of the flowers, also!
I just love how this turned out and will make these as gifts next year for Thanksgiving!!!

I hope to jump on again later to share my cornucopia that I am making out of pie crust with the cricut cake machine! Another idea that I got of the cricut circle blog.....my home away from home!!! I hope you all have a fun, safe and delicious Thanksgiving with your Families!!!

Wednesday, November 17, 2010

SNOW much fun!!!


Good afternoon friends!! I have had a lazy day around here today, but wanted to jump on and share these adorable ornaments! I had a vision of these one night and jumped out of bed to sketch it out! I know, I know....but it's not like any of you have never done that before...LOL!!! I am so pleased with how these adorable snowman and snowgirl ornaments turned out! I am entering the snowgirl into a cricut circle ornament challenge! The challenge was what got my wheels turning and the snowman was the first one to be complete, but I couldn't just make a snowman....I had to make a snowgirl version for my daughter. I changed the hat and loved working with pinks and blue for hers! I used the cuttlebug polka dots embossing folder...to make it look "snowy" of course! The snowman was cut from Doodle Charms and cut at 5 1/2 inches using the blackout feature...cut twice! The presents were also cut from DC at 1 1/4 inches. The snowgirl hat and the snowflakes were cut using Winter Woodland cartridge. The hat was cut at 6 1/4 inches and the snowflake at 2 inches! I cut a circle out of the belly and adhered a photo to the back of the top layer, then used pop dots to adhere the two snowmen together and give it a little dimension! I punched a hole and added some white elastic cord to hang from the tree! The kids just absolutely love them and can't wait to decorate the tree this year!!

Monday, November 8, 2010

Give Thanks Card!

Here is a card that I made for the Cricut Circle weekly challenge....the challenge was to use a bird, at least 2 cricut cuts and stitching! I cut the turkey from Celebrate with Flourish and the thanks from Storybook, I hand stitched the X's, embossed the background with Seeing Spots and I made the pleated flower! I had originally planned on making some cuttlebug quilled flowers, but I didn't have one of the plates...I had them sent Fed Ex on Firday and would you believe....they came today about an hour after I finished this card!!!!! So, tonight I will be quilling in my jammies watching tv...yay!!! Hope you like this card and have a good night!
~Jeannine

Thursday, November 4, 2010

Sprinkled With Fun!

This has to be my all time favorite layout!! I love how this turned out! This is for the weekly challenge over on the cricut circle blog. This is the first challenge that I have participated in so far because I have been so busy and I am glad that I made time to enter! It was a sketch challenge this week so that made it much easier for me! I used the Sweet Treats cartridge for all 3 cuts....the ice cream cone is 5 1/2", the title is 3 1/4" and the crown is 2". I embossed the cone with diamonds and added some i rock gems to make it look like sprinkles and I couldn't resist using bling on this layout!! I also used a Martha Stewart punch called cherish and it is a punch around the page! Every time I walk past this layout, it just makes me smile!!!

Wednesday, November 3, 2010

Harvest Blessings Layout!


Good afternoon! I have been busy all morning with Dr. appointments and am glad to be home! My daughter is home today, she had a Dr. appointment this morning after mine and we found out that she has allergies, so we are just sitting on the couch watching cartoons! She also has been complaining of her eye getting blurry at school, so she is going for an eye exam on Monday night!
So here is a quick layout that I made last night using the Thanskgiving seasonal cartridge that I recently won! I was getting a little frustrated with some of the cuts....I was cutting them at 1 or 2 inches and they were tiny and not cutting nice at all. I have found that it is easier (with this cartrdidge) to cut most of the images larger than 3 inches! Anyway, it is just a simple layout for our Thanksgiving dinner picture! I cut the pilgrim silhoutte at 3 inches, the harvest blessings at 3" and the indian corn at 3 1/2 ". I used some Bazzill cardstock and some of the apple cider paper and ribbon. I used pop dots for the photo, the corn and the pilgrim. How cute is that pumpkin border???? I love it...it is a EK punch that my friend sent me called pumpkin chain. I just love it, it was the perfect accent for this layout! As simple as this layout is, I was happy to be scrapping again! I may go start another quick layout while my daughter is resting!

Sunday, October 31, 2010

A SPOOKTACULAR HALLOWEEN!!!!

Happy Halloweeeeeeennnn!!!! BOO!!


Here is a "Spooky" Halloween banner that my son and I made! I cut the banner using my cricut and Country Life cartridge and added a drippy goo border to the tops using the MS punch. I added some eyelets to make it sturdy and used ribbons (from the $ bin at target) to tie them together! We made the pleated flowers using the MS scoreboard and some hot glue....my son loved the hot glue gun and was very careful with it! I cut the cauldron, the potion bottle and the skeleton using the cricut October 31st cartridge. We just used some odds and ends spooky things that we had in our Halloween bucket. The acetate cuts are from recolections and were a great touch to our Spooky banner! We love how it turned out and it looks great in our living room!!


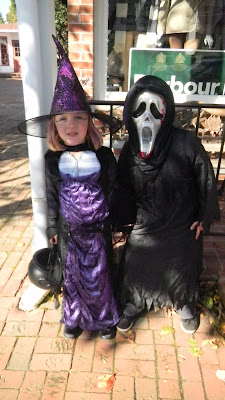
Here are my "SPOOKY" children this year at the Halloween parade and trick or treating in town!

This is Christopher's pumpkin that he carved by himself using a template......I think it turned out great....and looks just as spooky as he does in his costume!!

This is Samantha's pumpkin that we did together, we chose a not so scary pumpkin face and I think it looks great!!!

As we were carving the pumpkins this year....I remembered why we didn't do it last year....what a gooey mess! It really is fun though!

Here is an owl that Christopher made at his class halloween party....the cutest owl ever! The parent who chose this craft deserves so much credit...she hand cut all the pieces for this and had to cut enough for 22 kids! I think it is just adorable!!

I hope everyone had a fabulous day full of tricks and treats.....maybe not so much on the tricks, but I for one will be enjoying a treat or two when the kids go to bed.....lol!!!