Tuesday, December 31, 2013

Happy Birthday!!


Good morning!  Yesterday was my baby's 10th Birthday! I took her home 10 years ago today as a tiny pink bundle...where does the time go???
We had a great day with presents, bowling, family and cake! Could it get any better?!
I had bought this stamp from Simon Says Stamp just to use it for my daughter'a birthday card...she loves to bake and this was perfect!  I had so much fun coloring it in with Tim Holtz distress inks and a paintbrush! I added wink of Stella to add some shimmer (love that stuff!)


Supplies used:
SSS Sea Glass cardstock
Spellbinders Lacey ovals die
Recollections city sidewalks paper
Hero Arts gems
Tim Holtz Distress inks (peacock feathers, fired brick, wild honey, spun sugar, worn lipstick, broken china)
Brown ink, versamark, white embossing powder, foam dots and bakers twine and wink of Stella glitter pen
Some Odd Girl "Tiny Baker Tia" stamp
Scrappy Moms Stamps- sentiment

I will enter this in the Simon Says Stamp
Bling It On Wednesday challenge!

Saturday, December 28, 2013

Birthday card!!

Hi there!  I hope everyone had a wonderful Christmas! We sure did...family, food and time with our kids!  Before we get to New Years celebrations...we have two birthdays to celebrate!  My niece is the 29th and my daughter will be 10 on the 30th! 
So, I whipped up a cute card for my young niece using some new Simon Says Stamp goodies!!

I used the SSS "I only have eyes for you" stamp set that was included in the January card kit! I used the dashed line stamp to create a border and used the 2 different balloons and the strings stamp! I popped up 2 of the balloons and the little sentiment banner (I had to write it because I didn't have a stamp with a small sentiment). I used American Crafts xoxo paper and Tim Holtz peacock feathers ink. I added some CTMH liquid glass to the heart on the one balloon and added some small red bling from SSS in the corner and that completes the card!
I wish I had some more time to play tonight but my feet are tired from ice skating with the kids today! Goodnight!

Sunday, December 22, 2013

Candy box treats

Hi there!  Wow, time sure flies! Can't believe Christmas Day is almost here!  I am getting really excited...probably as much as my kids! Lol!
I ordered this candy box board punch from WeRMemory Keepers and I LOVE it!   It works like a dream and is just so fast & fun!
I made a bunch of these for the kids in my Religious Ed class and just filled it with some candy! So quick & easy to mass produce!  I used some Christmas cardstock, adhesive and bakers twine!

Saturday, December 14, 2013

From our house to yours!!

Good morning!  Merry Christmas Eve!  I am getting super excited...probably more excited than my kids... Well it's close anyway! 
I have a card to share that I had fun making with some new supplies! I wish I had more time to create with all of my new Christmas stamps and goodies, but there's always next year! 
I used a SSS snowflake stencil and some blue ink to creat a soft background.  I used a SSS stamp and die for the house and fence..."Where the Heart is". So cute. I colored the house with Spectrum noir markers.  I cut a banner shape and embossed it with a Hero Arts polka dot stamp. The sentiment is from SSS the Holiday Hellos stamp set!  My husband was sosweet and let me order a ton of goodies from Simon Says Stamp and Lawn Fawn for my Christmas present! Thanks hon... Now if I could just order some time to play I'd be all set LOL!
Anyway...I wish you all a very Merry Christmas and a Happy New Year!!!

Lol...not sure why the date is the 14th but it really is Christmas Eve when I posted this!

Tuesday, December 10, 2013

Lunch box tags

Hi there!  Ok, well I can't seem to get enough of these Love 'n Breakfast Lawn Fawn stamps...totally in love!  I have had so much fun stamping, coloring and even fussy cutting these as there is no coordinating die set....hopefully there will be one day!
Anyway, I made two tags that tuck into a little bag for my kids lunch boxes. I know they will just love them!  The little ledger paper bags are from Scrappy Mom's stamps, they are so cute, just right to hold a tag and a snack size hershey bar....


All the patterned papers are from Lawn Fawn as well... it is the Peace,Joy love 6x6 paper.  I colored the images with Spectrum Noir markers...so fun! I am entering these in the Lawnscaping Challenges challenge...#71 Tags & Treat Bags!  Come check it out!

Supplies used:
Lawn Fawn Love 'n Breakfast stamp set
Lawn Fawn Peace Joy Love paper
Spectrum Noir markers: EB2, EB5, TB2, IG4, IG1, IG2, CT4, TN7, CR11
bakers twine, adhesive, foam dots, heart punch, memento tuxedo black ink, spellbinders postage stamp die

Monday, December 9, 2013

Start every morning with a smile :)

Good morning!  What a busy weekend!  My husband had to work a double shift, so I took my kids to a place that I have always wanted to take them but could never find the time....so years later, here we are with some time to go! LOL!!  I took them to a place called Gingerbread University....to make a large gingerbread house.  The house was assembled for us (with icing, not glue...that sounds strange, but we bought a house somewhere and it was put together with glue)  they supplied the icing in a bag and a tray of candy!  We were all so excited and the kids did a great job with it!

Anyway, I have a card for today that I made last night for the Lawn Fawn CHA 2014 catalog challenge! Go check it out! I am new to Lawn Fawn stamps and I can't get enough of them, they stamp beautifully, they emboss beautifully and they are just so much fun! So, I thought I would enter a card and give it a shot!


Supplies used:
Lawn Fawn Love 'n Breakfast stamp set
blue cardstock, Neenah solar white cardstock
Spellbinders Nestabilities Petite Scalloped Circle ~ largest die
Spectrum Noir markers (IG1, IG2, IG4, GB8, GB10, DR5, black)
white embossing powder, versamark ink, ATG, CTMH liquid glass, foam dots)

I created the card using two of the scalloped circles and adhered them together at the top.  I lined up the sentiment and then made it into a curve to fit the card front and embossed it.  I colored the images with Spectrum Noir markers (so fun) and fussy cut them out...adhered with foam dots.  I added liquid glass to the hearts and bows!  That is pretty much it!  Super easy, quick and I had lots and lots of fun with this stamp set!

Saturday, December 7, 2013

Happy Holidays

Hi there!  It has been a while since my last post, but my phone is not working with blogger so that leaves me to use my laptop, which is much more complicated...lol!!  
Anyway, I have a cute card that I made.  Remember the Caring Hearts card drive blog hop??? Well, I was a winner of the Lawn Fawn stamps & paper pack...I was so excited!  I picked the 6x6 Peace  Joy Love paper pad and the Lawn Fawn Into The Woods stamp set...Thanks so much Lawn Fawn.  So today's card features the deer (turned into rudolph) and the Peace Joy Love papers!! I used Neenah Solar White cardstock for the A2 base, I cut a strip of the light blue paper with little lines and spots...it looked like falling snow.  Then I added a diagonal stripe that I used a Spellbinders scallop border die to cut. I used a swirl stamp (very old) from Autumn leaves.  I used CTMH white ink and inked some swirls...for swirling snow.  I hand cut a small snow bank and used wink of stella glitter pen to make it sparkly.  I used a Happy Holidays flourish stamp (sorry, dont know who makes it...lost the packaging) I embossed the sentiment.  I added some red and white bakers twine and tied a bow.  I also added some tiny sequins from the Simon Says Stamp December card kit.


I almost forgot...I stamped the deer in momento tuxedo black ink and colored it in spectrum noir markers, then used the matching die to cut it out...love the little white border around it.  I added a red rhinestone from SSS.   I love how cute this card is and how much fun I had creating it!!!
I am entering this card in the Simon Says Stamp Monday Challenge blog...use a flourish.  Also entering it into the Cardz Tv go to galz Linky Party Challenge #9 "Winter Wonderland" challenge...create a winter scene!
Thaks fo much for stopping by!

Friday, November 22, 2013

Cards For A Cause!

Good morning and TGIF!!!
About 2 weeks ago I was checking in on the Lawn Fawn blog and I saw that there was a blog hop going on...so I went to the first site and started hopping. I am so glad I did!  The lady from lingshappyplace.blogspot.com was hosting a card drive for Holiday cards to give to the eldery in nursing homes.  I thought it was so kind of her to take the time to do such a nice thing and it touched my heart. I got my kids to make some supplies one weekend and I worked on a few here and there and together we mailed in 17 cards. Thats 17 smiles that we will put on faces of people that we don't even know and will never meet...to my family that is pretty special.  I wish I could have whipped up more and honestly my kids made most of them, but we still felt good about ourselves.  So here are two of the cards that I made and I didn't get pictures of the kids because I was in a rush to get them out in the mail.

 For this card, I embossed the front with a snowlake pattern and then used a MS punch all over snowflake punch and punched a strip of three. The paper was a beautiful blue, but I guess it was too sunny and didn't take a nice picture. I added a strip of ribbon and embossed the sentiment on a tag and tied a bow.
For this card, I embossed the different snowflakes in white on white paper and then rubbed on some blue ink.  I embossed the sentiment in silver and used a MS snoflake punch and embossed the snowflake in silver as well.  I used a spellbinders die to cut the sentiment out and used a pop dot on the snowflake.
I am so happy that I came across the Caring Hearts Card Drive and was able to participate!

Wednesday, November 20, 2013

Thanksgiving Card

Hi there!
Well, 'Tis the season....for colds.  Both of my kids have been sick. My son with a terrible sinus infection (second one in 4 weeks) and strep throat and my daughter with a cold.  They have been miserable and lethargic.  Today was the first day that they were both back in school since last Friday and I was sure to pack some hand sanitizer in their bags.  I had a few hours to spare today, so my husband and I started our Christmas shopping and we had so much fun!  I love getting what I want and not paying full price for anything!
So, with all that said, I have a card to share that I made for my parents for Thanksgiving!  It was a quickie, but I think it turned out nice!
I used some cream cardstock for the base and ran the front through the cuttlebug. I used a scallop punch on the burgandy border strip and then cut a piece of burlap and fringed it.  I stamped the sentiment on cream cardstock and just folded it and notched the ends to make a flag like banner.  I used the cuttlebug quilled flower kit to make the flower and leaves and added a bronze pearl in the center.  Super fast and simple.
I am entering this card in the CARDZ TV GO-TO GALZ LINKY PARTY CHALLENGE #8 "HAPPY HARVEST" on the Cardztv blog.  I just love Mary and all of her fun cards using both the silhouette and cricut machines and her stamps are great.  Come check out the challenge!
Thanks for stopping by and have a great night!

Tuesday, November 12, 2013

Life Is Good.....

Hi there!  Poppin' in with another quick clean & simple card for the Simon Says Stamp Wednesday Challenge Blog....Keep It Clean & Simple!   Here I used some floral paper and the Fiskars scallop edge punch along the bottom.  The papers are from the MME Cut & Paste collection.  I used some black ink and CTMH 'It's Your Day' stamp set for the bicycle, the sentiment and the corner image.  I added some faux stitching to tie in the black and mounted it on an A2 white card base with foam tape.
 
Thanks for stopping by today! Have a good afternoon!

Monday, November 11, 2013

Happy Veteran's Day!

Happy Veteran's Day!


Here is a quick and simple card that I made today in honor of Veteran's Day!  This was probably one of the fastest cards that I have ever made!
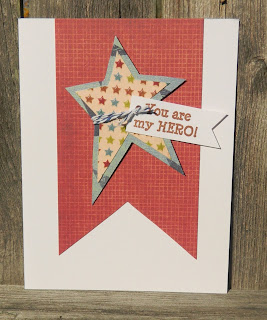
I used some paper from the DCWV The Guy Stack....cut a strip and notched the ends in a banner.  I used my coluzzle to cut the two star shapes and wrapped blue bakers twine around it and cut a simple little tag that I stamped with a Cardztv 'It's All About You' stamp set in chestnut chalk ink and just notched that as well.  I love how this card turned out and hope you do too. 

I am entering this in the Simon Says Stamp Wednesday Challenge....Keep It Clean and Simple....come check it out!

Clean & Simple

Hello! I have a card to share tonight that I made for the Simon Says Stamp.com Wednesday challenge blog...keep it clean and simple.  I seemed to have a hard time with this one...lol, it should be simple like it says, but I had a hard time and quite honestly wasn't really happy with the cards.  So, when I think of clean, I think white so all my cards are a white A2 card base and then I just grabbed some stamps and minimal supplies and started to create.

For this card, I used Hero Art stamps and stamped the trees using CTMH olive ink and then stamped the snowflakes using second generation stamping (stamped on scrap paper first) in CTMH Indian Corn Blue ink.  I stamped an extra tree on scrap paper and colored using Spectrum Noir markers and cut it out and added it to the card.  I made some snow mounds and glittered the edge.  I stamped, colored and cut the snowman and added him to the card with foam tape. All images and sentiments were from the same Hero Arts stamp set...but I didn't see a name for it.
  Come check out the Simon Says Stamp Wednesday challenge blog and join in, there is tons of inspiration!

Saturday, November 9, 2013

Mixing it up a bit.....

Good morning!
Happy Saturday!! Yay!  I won't be crafting today but  I have a birthday card to share...it was for my SIL's birthday this past week!


I had so much fun creating this card (I know I always say that lol!)  I used a 5x7 white card base and a Heidi Swapp mini hexagon mask with some Close To My Heart Olive ink and an ink dabber to apply shading from light to dark and added some to the top and bottome as well.  I added some crepe paper strips and vellum from the Dear Lizzy Neopolitan Specialty Paper pack.  I used my coluzzle heart shapes using some paper from Crate Paper and inked the edges.  I also used some Martha Stewart punched border strips...not sure of the names as I didn't keep the packaging, but it is a lace strip and then a lattice deep edge punch.  I just layered everything together.  I cut a banner strip and used silver embossing powder and some pearls.  Oh and I also used a mini heart punch and put some hearts in a few of the hexagons just to keep the eye moving!
I hope you like this sweet birthday card as much as I do!
I sure appreciate comments and feedback, so please feel free to leave them!
Thanks and have a great Saturday!

Friday, November 8, 2013

Giving Thanks Tags!

I have a late post for today....had a busy day but was able to whip together some tags!  I started a tradition when the kids were real little, where we give them a gift on Thanksgiving day!  It was usually pj's for the Holiday season or a Holiday board game....they really look forward to a gift and the Macy's Day Parade on tv every Thanksgiving morning!
So, I have created some tags for their gifts....haven't picked out the perfects gifts yet. I created these for the Cardztv Go-To Galz challenge #38 "thankful". 
I cut my own tags and embossed them with the polka dots cuttlebug folder and inked the edges.....

This tag is for my daughter, I added a strip of green paper and punched the edge using a Fiskars scallop punch.  The gold swirl paper...well that's another story. I was playing around with versamark, my cuttlebug and gold embossing powder...things didn't work out so well, but I kind of liked it enough to use it and add sparkle to the tag.  I had stamped the leaves using an Inky Antics 'Squirrel' stamp and used Heidi Swapp Color Shine mists to color them (they really shimmer). I added a button and some twine and of course sprinkled some sequins on.  I stamped the sentiment and cut the edges and added a tiny heart that I used dimensional glaze on.  The sequins, twine, green paper and sentiment are from the Simon Says Stamp October card kit ( I have had a blast using that kit, I love it).

This tag is for my son!  I just added some strips of pattern paper...all from the Simon Says Stamp October card kit. I added them at a diagonal and then just trimmed the edges.  I wrapped some bakers twine and cut the little flags out and adhered them using foam tape.  I stamped the sentiment and notched the edges.  I love the simplicity of this tag with the little strip of animal paper (from Lawn Fawn) and I just know my son will love it!
So there is my nice little tags!  I had a great time creating them and I have to say that I can't get enough of the Simon Says Stamp kit.  I will be placing a huge order with them next week for sure, I totally fell in love with the Lawn Fawn stamps and matching dies!  Thanks so much for stopping by and have a great night!

Thursday, November 7, 2013

From One Nut To Another......

Good morning!    It is a rainy day here and after having a stomach virus for a few days, I was feeling crafty!  I created this fall card...I know I should be making Christmas cards, but I just love the October card kit from Simon Says Stamp so much that I just keep creating with it!   So here is another Fall card that I made for the Scrappy Moms Stamp Terrific Tuesday Fall challenge.
 and here is the inside.... I couldn't resist this sentiment!

I used kraft cardstock and made a side fold A2 card base and rounded the two right corners using the 1/2 inch corner chomper and inked the edges.  I also did the same to the two mats, using Lawn Fawn 'into the woods' paper from the SSS card kit.  The sentiments, the squirrels and the leaves are from the Inky Antics 'Squirrel' stamp set and the little acorn inside the card is from the SSS 'Giving thanks' stamp set in the kit.  I used my Spectrum Noir markers to color....I need so much more practice with coloring, I am not happy with them, but I did have fun coloring and that's what counts....right?  I cut my own speach bubbles out around the sentiments.  I used Heidi Swapp Color Shine mists with a paint brush to paint the leaves (they have a great shimmer) in Chartreuse, Peach and Mustard and then just fussy cut everything out! Oh and I used some May Arts Natural Twine (also from the SSS kit) and I just love it, it is so thin and easy to work with!  I also used the Spellbinders Nestabilities Labels Eight die for the tan background shape.
I think it is a cute Fall card and I had so much fun creating it!  Come on by the Scrappy Moms Stamp challenge and join in!
Have a great day!

Monday, November 4, 2013

Nuts About You...Quilled Squirrel

Good morning!  I have had such a busy Monday morning with the kids and getting them off to school.  I did all of my morning chores and started laundry, so I thought I would post this card that I made last night!
I love to do quilling work, especially adorable little animals.  Here I quilled this adorable squirrel and used the Simon Says Stamp October 2013 card kit with a few other supplies to create my cutest card ever....well, I think it's cute!

This is a top fold A2 size card and embossed the front with a woodgrain folder and rounded the bottom edges.  I embossed the sentiment and the acorn using gold embossing powder...I love the texture on the acorn.  I made my squirrel using a "Forest Animals" quilling kit, this came together super fast and was so theraputic to make.  I used a peice of the Lawn Fawn 'Into the Woods' paper and cut the strips...the speach bubbles, the arrows and cut the triangles for the banner. I added some great Lawn Fawn 'Into the Woods' mixed sequins on the bottom just to add some bling because of the gold sentiment. I added some May Arts Natural Twine and popped up the banner pieces.   I hope you like this as much as I do.  I am entering this in the Simon Says Stamp Wednesday Blog challenge....Anything Goes!!  There are already a ton of entries....come check it out!

Supplies Used:
Forest Buddies - Quilled Creations kit
Simon Says Stamp October 2013 card kit
Simon Says Stamp 'Giving Thanks' stamp set
May Arts natural twine
Lawn Fawn 'Into The Woods' mixed sequins and 6x6 paper
We R Memory Keepers Corner Chomer
Cricut Cuttlebug 'Woodgrain' embossing folder
Versamark, Stampendous Gold embossing powder, foam squares, ATG

Saturday, November 2, 2013

You're So Tweet

Hi there!  I have a super simple card to share tonight.  I recently ordered the card kit of the month from Simon Says Stamp...the October kit.  I just love the tree stamp set and the Lawn Fawn papers and sequins.  You can check out the kits here.

I used kraft cardstock and a Hero Arts background stamp, not sure what the name is but I call it tree and here is the item #S5477.  Then I used Spellbinders petite scallop and cut a circle out.  I stamped the tree on the card front and embossed the bird and the sentiment.  I used foam tape to pop up the front panel with the embossed trees. 
I absolutely had so much fun creating this card....honestly, this is the first card that I made in a long time that didn't have a cricut or silhouette image.
Hero Arts background stamp
kraft cardstock
versamark, white embossing powder
Spellbinders petite scallop (3rd largest)
Color Box Chestnut Chalk ink
Close To My Heart Olive ink
foam tape

I am entering this card in the Anything Goes challenge at the Wednesday Simon Says Stamp Blog, where they are showcasing their exclusive stamps....come check it out....tons of inspiration and a chance to win a $50 voucher to shop at the SSS shop!
Thanks for stopping by!
Jeannine

Thursday, October 31, 2013

Happy Halloween Treats!!!

Good morning and Happy Halloween!!!!
  My daughter was super excited this morning to dress up as a skeleton (it was the first year that she wanted to be scary & simple) which was fine by me! LOL!  I did her face makeup and she was excited to bring her little treat bags to her class!

My kids don't really get a lot of candy trick or treating and what they don't like they donate to troops over seas through our dentist.  So, I decided to buy them a box of candy that they like and decorate it! my daughter got sprees, my son got swedish fish and my husband got whoppers...I got myself nerds but they were gone before they could be decorated lol!

I used my silhouette to cut the images...it did a wonderful job even though they were small and intricate!  I used some cardstock and papers from the K & Company Spooktacular paper pack.  I used the Martha Stewart web and spider punch to add some spooky effects.  For the tags, I used Sizzix tag dies and Cardztv "More Spooky Sayings" stamps.

                                                  (skelton frame- Silhouette #50114)
                                                    (Witch boots- Silhouette image #50120)
                                                      (spooky tree- Miss Kate Cuttables)

I am entering these goodies in the Cardztv Linky Party Go-To Galz color challenge #7 "Happy Halloween" challenge....had to use only black, orange and or purple ( and bits of white & green ok).  SO I decorated these accordingingly and it was easier than I thought to only use those colors and they came together well!

As much as I had fun creating Halloween treats and projects, I am looking forward to creating for Christmas!
Hope you all have a safe & fun Halloween!

Monday, October 28, 2013

Spooktacular Halloween Drinks!

Hi there!  I want to share these adorably spooky treats that I made for my two kids!  There is a witch brew (orange soda) and a spider venom (cream soda)!  I love how these turned out!
 
I wrapped some pattern paper around the bottles and added a spooky label that I got from the Silhouette store (# 49295) it was a print and cut, I absolutely love that feature!  I used some CTMH seam binding and used Heidi Swapp color shine in black and left some areas white, I thought it created a spooky effect.  I also sprayed some green using the chartreuse spray.  I only had white tulle so I sprayed that black as well and the color really took to it.  I had some papers with little spiders on them so I fussy cut two spiders and used pop dots to adhere them to the front of the spider venom bottle.  I also fussy cut some stars out of another pattern paper and adhered them to the witch brew bottle.  I actually enjoyed fussy cutting them out rather than having to go to my cutting machines. 
 
I used the spellbinders petite scallop dies to cut the black scallop and then used my coluzzle ( a long forgotten about tool that I love) to cut the circles.  I used a Cardztv "More Spooky Sayings" stamp set and embossed the sentiments....love that.  I love how spooky and fun these turned out and I know my kiddos will enjoy them!
 
I am entering them in the Scrappy Moms Stamps Terrific Tuesday Challenge - "spooky crafts" , Simon Says Stamp - Halloween or Halloween Colors Challenge and the CARDZTV Go-To Galz challenge # 38 - "Ghost and Goblin Party".....come check out these awesome challenges for some great inspiration!!
 
products used:
glass bottles of cream and orange soda
Cardztv stamps: More Spooky Sayings
coluzzle circle template
Spellbinders petite scallop dies
Silhouette Cameo design # 49295
Close To My Heart seam binding
Heidi Swapp black and chartreuse color shine
DCWV "The Ghosts and Goblins" stack
K&company Spooktacular paper
versamark ink, black embossing powder, pop dots, atg, glue dots


Monday, October 7, 2013

Cream of the Crop!

Hi again!!   I know this is a late post, but I wanted to share the card that I made for the ScrappyMoms Stamps blog challenge!  I made it in between painting my closet and doing 5 loads of laundry!!  Geesh, but at least I had a little time to get my crafting fix in...LOL!!!!

Ingredients:
Paper Trimmings cricut cartridge - pumpkin border (pg. 54) cut at 1.25 inches
Scrappy Moms stamp set
Burlap from Recollections
DCWV Ghosts & Goblins stack
Darice "leafy tree" embossing folder
Pebbles chalk, orange bakers twine, adhesive, brown ink

The lighting stinks in here and the card base is looking yellow when it is a cream colored cardstock.  I am pleased with how this card turned out and I am glad that I made some time to get in on the challenge!

Saturday, October 5, 2013

Hocus Pocus

Hi there and happy World Card Making Day!!  

Here is a halloween card that I made today!   My inspiration came from Mary at Cardztv....she recently did a fun folds card series that I totally enjoyed. So, for this card, I used the twisted easel card technique....I had never done this one before and quite honestly don't know if I will use it again, its just not my favorite!   But, I did have fun creating the card! LOL!!


Here are the ingredients:
Teddy Bear Parade cricut cartridge, witch cut at 3.25"
Sizzix 'ticket' die
Spellbinders: labels one (second largest), labels eight (the 3 smallest)
Cardztv stamps: "More Spooky Sayings"
Paper:  K and Company TC Halloween Specialty paper pad, DCWV The Ghosts & Goblins stack
Darice chevron embossing folder
additional:  adhesive, Martha Stewart glitter glue, glitter, tiny rhinestones

Assorted Cards

Hi there!   Happy World Card Making Day!!
I hope to be getting some cards made today to celebrate with the rest of the card makers out there, but first I just wanted to do a  quickie post of some cards that I made recently.  We had 5 birthday's and 1 anniversary recently, so I was busy putting these together...some I didn't even get pictures of and I didn't write down details but just wanted to share them anyway.....so here goes!

 
This card was for my niece who loves horses....the horse silhoutte is from the silhouette store.  I made a coordinating envelope using the envelope punch board (love that thing)!  I also added some embossing to the green paper because the cuttlebug flower folder kind of matched the flower patterned paper that I used!


This card was created for my parents anniversary.  The kissing couple and the ovals are from the silhouette store.  I added some embossing using the divine swirls folder and the 3 flowers in the center I made by hand.  I love how pretty this card turned out!


And finally, here is a set of thank you notes that I made for my son to write out!  They were super easy and fast to make.  I used an embossing folder for the top panel and added a ric rac strip using a punch and poped the sentiment up on foam tape.  Quick & simple....the way I like it.  I also thought they were very masculine which was what I was going for!
Well, thanks for stopping by and happy crafting! 

Friday, October 4, 2013

Monster Mash

Good morning!  Here is my first Halloween card for the season!  I had so much fun creating these little monsters and making it look silly with colorful googley eyes.....it looks like they are having a monster party!  So fun!

I got the inspiration to make a step card from Mary at Cardztv! She recently did a series of "fun card folds" and gave some great ideas for making different types of cards!  You can check them out HERE on her blog!  Thanks Mary for all of your awesome work and detailed instructions!

So I made the step card using green cardstock, 5 1/2x 12 scored along long side at 4 1/4, 8 1/2 and 10 1/4 inches then just used the mountain valley technique and voila you have a fun step card to decorate:

I used the Martha Stewart fence punch and added it to the card. 

Here are some monster details:
Pg. 28 (Icky) monster cut at 3.25"
Pg. 30 (monster) 3.25"
Pg. 25 (mummy) 3.25"
all paper is from my stash, sorry not sure of the names. The 'Monster Mash' sentiment is from "More Spooky Sayings" found at cardztvstamps.
The googley eyes are an assortment from Michaels and thought they were a fun touch to these silly little monsters!
Thanks for stopping by and have a great day!